MED-EL
Published Mar 08, 2017
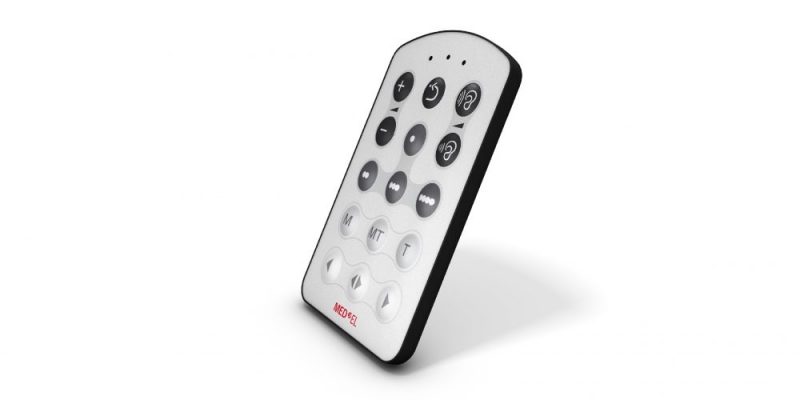
Everything You Want to Know About the FineTuner Remote

If you work with cochlear implant recipients who have a MED-EL audio processor, you may be familiar with the FineTuner Remote. Here’s a brief rundown of the basics and a few tricks that are useful to know.
Our processors are hands-free, so most settings adjust through Automatic Sound Management. But, if recipients want to change programs, connect to telecoil, or adjust volume & sensitivity manually, they’ll need their FineTuner.
Not everyone likes complicated gadgets, so we made sure FineTuner is simple, sturdy, and fits easily in a pocket. The buttons are easy to see and intuitive to use. The one-to-one button mapping is especially helpful for older recipients—each key is clearly labeled.
As an audiologist, you can enable or disable any button with a fitting. This can be helpful for children or older recipients wanting even simpler controls.
Here’s a quick hands-on to help show recipients what each button is for.
Can’t See This Video?
Having problems viewing this video? Watch it on YouTube.
FineTuner tips & tricks:
- Automatic keyboard lock helps avoid accidental button pressing
- Double-pressing a key unlocks the keyboard for 10 seconds
- Bilateral users can control both processors together or independently
- T mode provides input of the telecoil only
- MT mode is 50/50 balance between telecoil and microphone
- FineTuner can change between any program in less than a second
The first time you connect a processor to FineTuner, you’ll need to synchronize them. It only takes a few steps and can be done by recipients. They’ll want to be familiar with this if they often use a spare processor.
To synchronize FineTuner with an audio processor:
- Turn off the audio processor
- Place the coil of the processor over the MT key on FineTuner
- Turn on the processor
- The audio processor and FineTuner will be synchronized automatically
- The two amber indicator lights will blink briefly to confirm
Recipients should see several months of FineTuner use from a single CR2025 battery. When the battery is low, the red indicator light blinks three times.
To change the FineTuner battery:
- Open the back battery cover of FineTuner with a small screwdriver
- Lift out the used battery with the coil magnet or gently shake the battery out
- Replace the used battery with a fresh button-cell CR2025
- Insert the new battery with the + sign facing up
- Close the lid by gently inserting it on the right-hand side, then sliding it in place
- Tighten the screw to finish
That’s all—we like to keep it simple. Have a question about using FineTuner? Leave a comment below! And don’t forget to subscribe today to get our hands-on articles right to your inbox.
*Not all products and features shown are available in all areas. Please contact your local MED-EL representative for more information.
MED-EL
Was this article helpful?
Thanks for your feedback.
Sign up for newsletter below for more.
Thanks for your feedback.
Please leave your message below.
CTA Form Success Message
Send us a message
Field is required
John Doe
Field is required
name@mail.com
Field is required
What do you think?
The content on this website is for general informational purposes only and should not be taken as medical advice. Please contact your doctor or hearing specialist to learn what type of hearing solution is suitable for your specific needs. Not all products, features, or indications shown are approved in all countries.
MED-EL


Conversation
1 Comment