

Join Clinicians Worldwide
Evidence-based insights to enhance hearing care - twice a month
Subscribe Now Evidence-based insights to enhance hearing care - twice a month
Subscribe NowMED-EL
Published Sep 19, 2018

Want to maximize comfort and hearing performance for your patients with conductive hearing loss? ADHEAR is our revolutionary non-surgical solution for both temporary and chronic conductive hearing loss.
Today, we’re going through our top tips for getting the best performance from ADHEAR for your patients. If you haven’t seen our ADHEAR overview yet, get started here!
ADHEAR uses a unique adhesive design, so handling is a bit different than traditional softband or hardband bone conduction systems. Don’t worry—with these helpful tips, you’ll soon be an ADHEAR expert.
ADHEAR connects to the skin using an adhesive adapter. This provides a comfortable, pressure-free pathway for bone conduction.
Each single-use adhesive adapter can be worn for up to 3–7 days. They’re water-compatible, so the adhesive adapter can be worn while showering, bathing, or swimming.
To maximize wearing time, it’s important to make sure the ADHEAR adhesive adapter is applied correctly.
Can’t See This Video?
Having problems viewing this video? Watch it on YouTube.
Preparation
1. Wash your hands to remove any dirt or oil.
2. The area behind the ear where the adhesive adapter will be applied must be hairless. In case the naturally hairless area behind the ear is too small, it should be shaved.
3. Dab the skin behind the ear with a skin-friendly alcohol wipe or mild soap to remove sweat and oil.
4. Wait a few minutes to make sure that the skin where the adhesive adapter is to be applied is completely dry. Only apply the adhesive adapter on healthy skin.
Applying the Adhesive Adapter
1. Place the adhesive adapter loosely in the positioning tool cavity. Remove the protective film. Do not touch the adhesive surface.


2. Move the hair away from the application area, find the correct position where the tool is lightly touching the ear and then press down firmly. The adhesive adapter must be placed over bone.


3. Remove the positioning tool. Press down firmly the entire adhesive adapter with your fingers. To achieve an optimal attachment, the adhesive adapter should be pressed onto the skin for at least 30 seconds. For optimal adhesion, wait for 15–20 minutes before connecting the audio processor.


4. Each adhesive adapter can usually be worn day and night for up to 3– 7 days before it should be replaced. Remove the adhesive adapter by slowly peeling it off the skin.
*Please note that the adhesive adapter is for single-use only and the adhesive cannot be removed and reused after it has been attached.
Key Tip: For humid conditions or sweaty skin, one of these additional products may be helpful.
Connecting ADHEAR
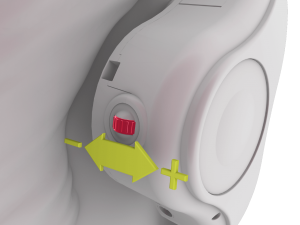
1. Find the coupling position. This is where the inner edge of the coupling plate of the audio processor touches the snap connector of the adhesive adapter. The taller side of the processor should be facing forward towards the ear.
2. Press the audio processor down onto the snap connector of the adhesive adapter, while tilting the audio processor from behind towards the pinna in a rolling motion.


3. The final position of the audio processor can be adapted by gently rotating the audio processor.
4. To learn this process while being able to see their ADHEAR, patients can place an adhesive on the back of their hand or other solid surface and practice snapping the processor on & off.
*For optimal performance the audio processor should rest freely and not touch the pinna, glasses, headwear, or clothing.
Disconnecting ADHEAR
1. To disconnect the ADHEAR audio processor from the adhesive adapter, press the audio processor down at the end closest to the ear.


2. Do not pull in any direction or press down the rear as this may dislodge the adhesive adapter from the skin.
Key Tips
ADHEAR uses a single size 13 zinc-air battery (also known as a PR48 battery). Battery lifetime is usually one to two weeks depending on usage.
Can’t See This Video?
Having problems viewing this video? Watch it on YouTube.
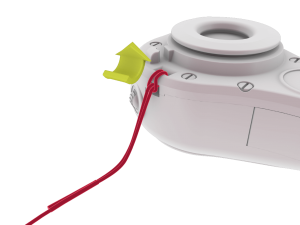
1. To change the battery, first remove the empty battery. Pro tip: The included MED-EL cleaning brush has a magnetic tip that makes it easy to remove the battery.
2. Activate a new battery by removing the plastic tab. For best results, peel the tab off the battery 1–2 minutes before inserting it. This exposes the battery to air and lets the zinc-air battery charge up more completely.
3. Insert the new battery into the battery compartment with the + sign facing outward.
4. After closing the battery compartment, there is a start-up delay of a few seconds followed by an alert tone to show that the device is ready to use.
ADHEAR has 4 pre-configured programs and volume control that can easily be adjusted on the processor.

To change the program, simply press the program button on the processor. ADHEAR always starts up in program 1 when it is switched on.
ADHEAR has a built-in volume control. Simply scroll the volume wheel away from the skin to increase the volume.
Scroll towards the skin to decrease the volume. Changes in volume are indicated by a beep.
You can connect ADHEAR to a retention clip with a loop. This clip can be attached to clothing.
A retention clip is recommended during physical exercise, sports, play and in other situations when there may be a risk of the device falling off.
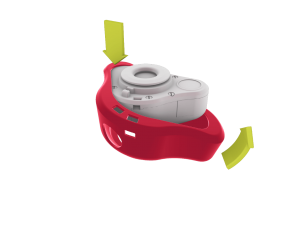
The ADHEAR sleeve offers additional protection, particularly for younger users. It is simply pulled over the audio processor.
You can clean the outside of the ADHEAR audio processor with soft baby wipes. Do not clean ADHEAR in or under water. The metal coupling plate should be cleaned weekly with the cleaning brush provided to remove dirt from inside the circular coupling plate groove. The gap between the housing and the coupling plate should also be cleaned with the cleaning brush.
When not in use, ADHEAR should be kept in the case provided. You can remove the battery from the audio processor to extend battery life. You should always remove the battery if you do not use the audio processor for a longer period of time to avoid battery leakage and possible damage to the audio processor. Store the adhesive adapters in a dry place at room temperature.
If your patients live in a humid climate or perspire heavily, the audio processor should be placed in a drying container (available separately) instead of in the case when it is not being worn.
ADHEAR has a 3-pin to 3.5mm standard headphone jack audio adapter cable that can be connected to different external devices, such as mobile phones & tablets, FM systems, and wireless receivers.
Can’t See This Video?
Having problems viewing this video? Watch it on YouTube.
1. Connect the audio input cable to the external device and the audio processor. Make sure that the dots on the cable and on the bottom side of the audio processor align.
2. Press the program button to put ADHEAR in program 3 for a balance of external audio input and ADHEAR microphones. To hear only external audio, switch to program 4.
Have a question about ADHEAR for your clinic or practice? Let us know in the comments below!
Want to know how to offer ADHEAR in your clinic or practice? Contact your local MED-EL representative or use our simple contact form!
Don’t miss any updates—subscribe now to get the latest articles from the MED-EL Professionals Blog.
*Not all products, features, and indications shown are available in all areas. Please contact your local MED-EL representative for more information.
MED-EL
Was this article helpful?
Thanks for your feedback.
Sign up for newsletter below for more.
Thanks for your feedback.
Please leave your message below.
CTA Form Success Message
Send us a message
Field is required
John Doe
Field is required
name@mail.com
Field is required
What do you think?
The content on this website is for general informational purposes only and should not be taken as medical advice. Please contact your doctor or hearing specialist to learn what type of hearing solution is suitable for your specific needs. Not all products, features, or indications shown are approved in all countries.
Dave Wharton
April 19, 2023
When listening to people speaking I find that I can hear the volume of the person speaking but the clarity is not very good. It sounds a little echoed. In other words it's more of an amplifier than a hearing aid. Also I am convinced that a remote would enhance the product. I do have a traditional in ear hearing aid with a remote and I find it very useful. More focus should be on the listening of the human voice. That's what most people with hearing problems really want.
MED-EL
April 28, 2023
Hi Dave, thanks for your comment. We recommend getting in touch with your local MED-EL team as they can help with the correct fitting of your audio processor. Please reach out to them here by searching for your area: https://www.medel.com/clinic-finder Kind regards, Gordana
Steve
May 13, 2023
I just got my med el adhear to use for my single sided hearing loss. It doesn't do anything at all ? I cannot hear from my left side at all while wearing it ? What's going on ??
MED-EL
May 19, 2023
Hi Steve, thanks for reaching out. We recommend contacting your local MED-EL team via https://www.medel.com/clinic-finder as they are best equipped to help you check your device on-site. You can also contact them here: https://www.medel.com/contact-med-el Kind regards, Gordana
Dianna
August 12, 2023
I just received the product 5 days ago. I keep hearing loud feedback from the processor. So loud that others around me can hear it. It gives me a headache. It was even doing this at the audiologist appointment. She told me that my brain will get use to it. But all it’s doing is giving me a headache and every time I go back it’s over $100 for the appointment. Is there anyway that I can tune it, to fit my needs. The volume wheel is useless.
MED-EL
August 21, 2023
Dianna, thank you for reaching out. We would recommend getting in touch with your local MED-EL representative so that they may assist you directly. You can find your local MED-EL team's contact details here: https://www.medel.com/clinic-finder/ Kind regards, Alicia
Aaron
February 26, 2024
Does the samba 2 have connectivity to the Adhear? I have heard that you can then use a roger x receiver to connect to a roger touchscreen. Does this work?
MED-EL
February 27, 2024
Aaron, thank you for your question. You can learn more about the connectivity options for SAMBA 2 and ADHEAR here: https://www.medel.com/hearing-solutions/accessories/connectivity However, it is not possible to connect/synchronize SAMBA 2 to ADHEAR. Kind Regards
MED-EL
Get the latest research and resources to help people with every kind of hearing loss. Subscribe to the MED-EL Professionals Blog now.
Registration was successful
We’re the world’s leading hearing implant company, on a mission to help people with hearing loss experience the joy of sound.
Find your local MED-EL team
The content on this website is for general informational purposes only and should not be taken as medical advice. Please contact your doctor or hearing specialist to learn what type of hearing solution is suitable for your specific needs. Not all products, features, or indications shown are approved in all countries.


Conversation
4 Comments